Thursday, February 12, 2015

How to Use a Stump Grinder

If you're like me then there was a point in your life where you thought you could remove a stump in your yard or on your property by digging it out. Shortly there after you told yourself "never again." You probably had to use a chainsaw, shovel, ax, and a WWII style flame thrower just to finally get it out after a whole day of work. Only to be left feeling dissatisfied knowing there could have been a more efficient way of doing it. Well guess what, there is! 

Using a Stump Grinder can make the stump removal process a whole lot quicker and easier. Basically a stump grinder uses a spinning wheel outfitted with teeth to chip away at the wood and shave it down until you can cover the remains with dirt and grass. It's still a lengthy process, but compared to digging it out it's a fraction of the time.

When getting rid of a stump you have a few options depending on your situation. If you have a small one-off project it would probably be a good idea to hire a tree removal company to do it for you. If you have multiple stumps or a larger project you might want to consider renting one and handling it yourself. If you are constantly trying to remove stumps on a regular basis, for whatever reason, buying your own might be the way to go. Asses your situation and proceed with the option that will save you the most time and money.

 Safety First

Before we get down to brass tax we should discuss using the proper safety techniques when operating a stump grinder. First and foremost you should thoroughly read the instructions or have a seasoned operator explain how to safely use the machine, since different models operate differently. You should make sure you are always wearing hearing and eye protection, and it would be a good idea to wear gloves as well. 

Before You Start

Before you fire up that stump grinder and start digging away there are a couple things you will want to do to make the job a little easier. First, you will want to make sure you clear the area or any loose rocks or other solid material. This will prevent the teeth from getting dull and it will keep random objects from flying up and hitting you in the face.

Next you will want to take a chainsaw and cut the stump down as low as possible. It's not necessary, but it will help save you time. The stump grinder shaves the stump from the top down, so the lower it is to the dirt the less time will be spent grinding it.

 Dig In

There are different types of stump grinders out there, some that use a hydraulic arm and some that are manually maneuvered. With either one you will want to start by positioning the wheel over the edge of the stump and begin to shave off 1-2 inches moving the wheel horizontally across the stump. Continue this motion back and forth moving down the stump until you're about 3-4 inches below the dirt. Continue this process until the entire stump has been shaved down at least 4 inches below the ground. Here is a time lapse video of the process for reference.

Depending on the size of the stump and if you were able to trim it down with a chainsaw, the whole process should take you 30 minutes to an hour. That is far less time than it takes to try to get it out by hand. It is also a lot less work intensive.

Finish Up    

Once the stump is removed it's up to you to decide what to do with that space. Maybe you want to fill in the hole with soil and plant some grass, or maybe you want it to be the start of a garden. Either way, you now have the option instead of just looking at an unsightly stump all the time.

If you would like more information on stump grinders or to check out a great selection, just visit Chippers Direct. I am available to take your calls and answer any questions you may have.



Thursday, January 15, 2015

So You Fancy Yourself a Logger?

If you have been working in the forestry or arborist industry for a while, you might think you have what it takes to go up against the best in the world in a logging competition.

There are events held each year that pitch the best loggers and lumberjacks in the world against each other in competitions of speed, strength, precision, balance, safety, and just overall raw talent! All centered around the use of chainsaws, axes, saws, climbing gear and anything logging related.

For most competitors there are three main events you can compete in. In the US the biggest annual competitions are the STIHL Timbersport Series, and Lumberjack World Championships. In Europe it would have to be the biannual World Logging Championship. All consisting of their own individual, yet similar events.

Stihl Timbersport Series

Started in 1985 in Wisconsin, it is one of the most popular logging competitions today. It consists of six different disciplines with collegiate and professional divisions. The most recent championship was held on June 20th-22nd, 2014 in Norfolk VA, and featured athletes from all around the world.

The six events consist of:

  • Springboard - An athlete cuts two notches in a 9 foot pole where they insert the spring boards that they use to climb up to chop off the top of the pole.
  • Stock Saw - Competitors use identical Stihl chainsaws to make two cuts through identical logs marked by black lines.
  • Underhand Block Chop - Standing on a log, the competitor uses an axe to chop it in half. They must make cuts from both sides. 
  • Single Buck - Using a single man cross cut saw, the athlete cuts through a piece of 18"-20" white pine. They can have a helper that lubricates the saw and wedges the wood.
  • Standing Block Chop -  Competitors use and axe to cut through a piece of white pine that is 12"-14" in diameter. They must cut the log from both sides.
  • Hot Saw - In this event the competitors use custom saws with modified engines to make three cuts as fast as possible through the log.

Lumberjack World Championships

This is the oldest competition of the three and is the only one that involves climbing and log rolling events. It is also the only one that does not change locations. Held annually beginning in 1960 in Hayward, Wisconsin this event features men's, women's, and team divisions.

The list of singles events include:

  • Underhand Block Chop - Same as above.
  •  Standing Block Chop - Same as above.
  • Springboard -  Same as above.
  • Single Buck - Same as above.
  • Hot Saw -  Same as above.
  • 60 and 90 Foot Speed Climb -  Using climbing gear, the athletes scale the respective distance up a pole and then descend against time. Time starts at the "go" mark and is stopped when they return to the ground. The contestants must also touch the pole every 15 feet on the way down.
  • Logrolling -  Two athletes compete head to head in this event. Standing on a floating log each contestant tries rolling, stopping, or changing direction of the log to throw their opponent off balance and putting them in the water. 
  • Boom Run -  Floating logs are set up end to end between two docks. The athlete then sprints to either end of the booms for the best time.
The team events are as follows:
  •  Double Buck - Two contestants team up to use a two-man bucking saw to cut through a 20" white pine log as fast as possible.
  • Jack and Jill - This is a double buck competition with a man and a women competing on the same team.
  • Team Relay -  Two teams race for time. Events include a 60-foot speed climb, 2 boom runners (one male, one female), hot saw, female single buck, and a standing block chop.

World Logging Championships

This event is held every two years in a different location around Europe. As opposed to the other two competitions, the WLC consists of 5 different disciplines mainly focus on chainsaw skills. The last event was held on September 10th-13th, 2014 in Brienz, Switzerland. The next event will not be held until 2016.

The 5 disciplines preformed in order include:

  • Tree Felling - The competitor must fell a tree in three minutes towards a spot selected by said competitor. Points are awarded based on time, proximity to the selected target, and length and depth of the cut.
  • Chain Fitting -  In this timed event the competitor must remove the existing bar and chain, rotate the bar, replace the chain, and reassemble. The trick is though that the chain must be properly adjusted as the saw has to be used for the next two events. Points are deducted if they have to re-tension their chain.
  • Combined Bucking - On a sloping log, the competitors cut two discs from the stump starting with an under cut. They then move to another log slopping in the opposite direction. Points are awarded for how straight and even the cuts are.
  • Precision Bucking -  This event requires the competitor to make as straight of a cut as possible without cutting into the wood situated under the log. Points are deducted based on angle of the cut and cutting into the wood underneath. 
  • Limbing -  In the limbing competition the participants must saw off 30 limbs specifically placed on a 20-foot pole as fast and as close to the pole as possible. If the branch is left too long (5mm or more) or if they cut into the log (5mm or more), time penalties are assessed. Watch this video from the 2012 WLC limbing competition. 


All of these competitions have team relay races, so if you got some buddies who you think could take on the best then you better call them up and get your names in. The Lumberjack World Championships requires that you have women on your team, so if you can find this girl you'll be better off - 


So there you have it. If you think you are worth your salt as a logger, brush up on your chainsaw skills and get signed up for one, or all of these events!


Top Earth Augers of 2015

With ground-thaw just around the corner, I thought it'd be wise to share with you the top three earth augers of 2015.

In my expert opinion, I've chosen to list the top three in good, better, and best format.


First, I'll give the good:

GOOD: Earthquake 43cc One Man Earth Auger

The Earthquake E-43 one-man earth auger delivers outstanding power and a solid design that will have you drilling holes quicker.

It's great for building decks, installing fences, and many other outdoor projects.

The E-43 has a compact design. The 43cc Viper 2-cycle engine delivers powerful output, taking the work out of hard digging.

Whether it’s a deck, fencing, planting trees or installing a mailbox – you’re sure to find multiple uses around your property for this versatile machine from Earthquake.

The Viper engine starts with ease, thanks to a direct inject primer and choke system, and the wrap-around foam anti-vibration handlebar grips provide additional comfort while drilling.


One of the best features is its heavy-duty transmission with five ball-bearings, giving it the ability to hold its own against the toughest soils.


BETTER: Earthquake Dually 53cc 2-Cycle One- or Two-Man Earth Auger

The Earthquake Dually earth auger enables you to drill holes by yourself or with a partner. It's the first one/two-man gas-powered earth auger ever created.


The Dually handles incredibly well when operated by two people.

What sets it apart is that the Dually can also be run used by a single operator - a first for powered earth augers.

This Earthquake auger features unique job site handlebars that are specially shaped for its dual-purpose use.

It has throttle controls mounted on the handlebars in two different user positions, giving operators the versatility to control the unit from the position best suited for their individual use.

The handlebars are also virtually indestructible, and are formed into a protective cage that guards the engine on all sides.

The Earthquake Dually is powered by a high-RPM 52cc two-stroke Viper® Engine, so it has the power you need, whether working alone or with someone else to drill each hole faster. The Dually features a durable, five-bearing transmission and solid steel heat-treated alloy gears for added strength.

BEST: Earthquake 190cc Two-Man Earth Auger

The Earthquake 9800B two-man earth auger gets big jobs done faster and more reliably. They're designed for the very big jobs, able to tackle a wide range of soils and rip holes as large as 14 inches in diameter with exceptional control.

The 9800B is equipped with a 675 series Briggs & Stratton® engine, featuring low gear ratio to provide powerful torque and durability.

The 9800B will even remove rocks and stones that would stop most smaller earth augers.

They're perfect for landscaping businesses, some commercial applications, and any post hole digging or landscaping jobs where the soil is very hard or rocky.

The Earthquake 9800B earth auger comes equipped with anti-vibration handles providing multiple hand positions for a comfortable grip. This is ideal for any job that requires digging multiple holes, as it'll help to reduce the time needed and put less strain on your back.

These are perfect for building decks, installing fences, planting trees and shrubs, mailbox installations and many other projects.

For more information on earth augers, visit  TillersDirect's Earth Auger Buyer's Guide

Thursday, October 23, 2014

Wood Chipper vs. Chipper Shredder - What's the Difference?

If you have been shopping around for a new wood chipper, you have undoubtedly came across wood chippers and chipper shredders. They are very similar in appearance and purpose, and could easily be confused if not careful. The style that you choose will be dependent on the type of work you are planning on getting accomplished. In this article I will highlight the major differences between the two and the specific functions of each.

 Wood Chipper (No Shredder)

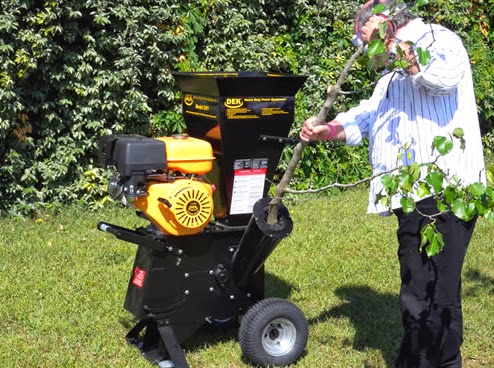
A wood chipper is a style of outdoor power equipment that is used to reduce wood, usually in the form of stumps, branches, and sticks into smaller manageable wood chips. They have a large hopper where the wood is fed into, a long chute that looks like a giraffes neck that ejects the chips, and are typically powered by a gas engine.


Internally the chipper typically consists of a large fly wheel with a blade or blades attached to one side (top image on the left). It spins at a high rate of speed and cuts the wood into smaller pieces. Those pieces are then ejected from the machine through the chute.

Wood chippers come in many different sizes that can handle larger or smaller diameter branches. They are typically used by industrial and municipal workers that need to reduce a large amount of debris into manageable chips for transport, storage, or disposal. Stand alone wood chippers will not shred the debris into mulch or compost.

Chipper Shredder

A chipper shredder looks similar to a stand alone wood chipper only smaller with a few cosmetic differences. One of the first things you will notice is that a chipper shredder has two hoppers instead of one and does not have the long ejection chute the wood chipper has.


The insides of a chipper shredder are not much different than that of the stand alone wood chipper. There is still a fly wheel with blades attached for chipping purposes. However, on the opposite side there are sets of dull blades or hammers called flails that are used to pulverize soft material such as leaves, twigs, and other organic debris (top image on the right). The wood chips or mulch is then ejected either out of the bottom or side of the machine.

Chipper shredders are typically smaller and used more often by homeowners. They can be rolled around on the property and easily stored when not in use. The shredding capability allows the user to transform yard debris into valuable mulch that can be used in garden beds or compost piles.

Which is right for you?

The style you're going to want to go with depends on the work that needs to be done. If gardening and composting aren't your thing, and you constantly have a lot of large branches that need to be cleaned up then you will want to go with a wood chipper. If you have less property and could use the mulch for gardening, then you are going to want to go with the chipper shredder.

For more information on wood chippers, chipper shredders, and stump grinders, or to shop around for the right product, please visit ChippersDirect.com.

Friday, October 10, 2014

Seasoning Your Firewood!


If you have a fire place or a wood burning stove and use it regularly, properly seasoning or drying your firewood is a must. Burning unseasoned firewood can be a hassle in the short term and dangerous in the long term. Freshly cut wood can contain up to 50% moisture and when burned can create a lot of smoke, low fire and heat output, and short burn times. Over a long period a substance called creosote can build up in your chimney and can be potentially dangerous.

Creosote is a black oily substance that builds up around the inside of a chimney or flue that is caused by burning wet wood at low temperatures. The low heat causes incomplete combustion of the oils in the wood, which are then carried up the chimney as a gas by the smoke. As the gas cools it condenses around the sides of the chimney causing the build up over time. If enough creosote accumulates it can cause smoke to back up into the house and even ignite, potentially causing a house fire.

 Creosote Build Up

To prevent this you must reduce the moisture content in the wood to around 20%. This ensures that the oils have not fully evaporated, which help the wood burn at a higher temperature. This will allow the wood to burn hot enough to completely ignite the oils reducing the creosote build up.

Here are the steps involved in properly seasoning your firewood:

1. Selecting the right wood

Not all wood is the same. Some are harder with more knots, some burn hotter, and some smell different while burning. Knowing what kind of wood you are using is important in knowing how long you need to season it. For example, oak is a very good type of wood for burning. It is dense, burns hot, and you should season it at least a year before burning. Check out this quick guide on Best Wood for Fires.

You will first need to select the tree you are going to fell. You want to make sure it is not dead and rotting as it will not burn well, and there will be a lot of mold and bugs living in there. It is a good idea however, to remove it to allow for healthy competing trees to grow. You will want to select trees that are crowded or inferior that are competing for sunlight and soil nutrients. This will allow the healthiest and most productive trees to thrive.


2. Cutting and Splitting


After your tree comes down you're going to want to remove the limbs and cut it into chunks, also known as limbing and bucking. The most important thing here is to make sure you get the right length and are consistent. Uneven lengths will make your cords unbalanced. Sixteen inches is pretty standard, if you have a 16" bar you can use that to measure, otherwise you can use a tool like the Mingo Log Marker.  

Once you're done bucking the tree, you're going to want to split the chunks into manageable pieces. There are a few different ways you can go about this depending on the amount of wood that needs to be split. You can use a traditional splitting maul, which is good if you have minimal work as it requires a lot of energy. There are manual log splitters that require less energy but are more time consuming. And then there are gas or electric powered hydraulic log splitters which will be your best bet if you have a lot of wood to split.

http://www.logsplittersdirect.com/Ariens-917011-Log-Splitter/p10483.html
  22-Ton Gas Powered Hydraulic Splitter

3. Stacking and Storing

Now that you have enough pieces of the right size and type of wood, it is time to stack them up. This part is where you are not going to want to get lazy and pile your wood up like this:


The wood in the middle of pile will mold and rot before it has time to dry. You also want to keep the wood off the ground so it doesn't absorb moisture. Stacking in rows with a couple of feet between them to allow wind and sun light to dry them out is ideal. Getting a log rack is great for keeping the rows nice and neat.

The size of your stack is dependent on how much space you make available but wood is measured in cords. A cord of wood is 4' x 8' x 4' and is 128 cubic feet. You can even get artistic with it if you want!


After you have it all stacked up, you're going to want to cover it. Using a tarp secured to the top works perfectly. Make sure you don't cover everything, you want the ends of the wood exposed to help dry it out.

4. Wait

Most wood takes 6 months to a year to completely season depending on what type of wood you're burning, so you're going to want to plan ahead for that. You will know your wood is seasoned when it looks like this:


Once it is a darker color with cracks on the ends it is probably good to go. Another way to check is by burning a piece. If it doesn't ignite well and hisses then it is too wet to burn.

So there you have it! Seasoning your firewood will make your life easier if you are the kind of person who burns it on a regular basis. Take these steps and apply them properly and you will have plenty of great burning firewood to last you for many winters!


Wednesday, September 17, 2014

Why You Can't Buy Stihl Online

Whether you're new to the chainsaw game or you have been doing it for a while you have undoubtedly heard about Stihl, and you might have tried to shop for it online only to come up short. If you are looking for a convenient shopping experience by ordering online then you might want to consider another chainsaw brand.

It has been the policy of Stihl since the beginning to not sell their products online. Instead they stick to strictly selling their tools through dealers in "brick-and-mortar" stores. The reason for this, according to their website, is because "Dealers are required to unpack, prep, and test every unit they sell, and then take the customer through a short training session on the parts and controls of the unit both for their safety and protection as well as for familiarity of the power tool in question."

This business model has served them well for many years, and as many of the die-hard Stihl fans will attest, it is an admirable approach to servicing their customers. So if you have your heart set on a Stihl product you are required to make a trip to the nearest dealer. However, if you're the kind of person who prefers to do their shopping online you need not worry. There ARE other options!

When it comes to power equipment most people are willing to pay extra for top quality products. And when it comes to Stihl there are few that compare; some even following a similar "no-internet" business approach. But if you're looking for a top-quality product that allows for the convenient, money saving online shopping experience, you need look no further than Husqvarna (pronounced husk-var-na if you're unfamiliar with the brand).

The Stihl vs. Husqvarna rivalry is comparable to that of Chevy vs. Ford. Two top-of-the-line products with die-hards on either side. Just punch in Stihl vs. Husqvarna into Google and you will find a whole slew of articles and videos comparing the two.

When it comes to shopping for a new chainsaw it all just boils down to personal preference. Do you want more torque to cut through the tough knotty wood, or do you want more speed to get the job done quicker. If you're looking for some help on how to pick the perfect chainsaw, visit Chain Saws Direct or give me a call and I would be more than happy to help.

Monday, August 11, 2014

Leaf Mulch Advantage

A lot of people see leaves as a nuisance, but when the trees on your lawn shed their leaves this autumn, you may want to think twice before dragging them in bags to the curb.

Leaves are of course organic, and therefor they hold nutrients. Even after they die and fall to the ground, they're still nutrient-rich. However, you don't want to just leave them blanketing your lawn because they'll prevent sun, rain, and oxygen from getting to your lawn's roots.

Instead, break them down into smaller bits and you'll have an incredible fertilizer and mulch. Once the leaves are shredded, they can be added to a compost pile, spread over the soil in your flower bed or garden, or even sprinkled into your lawn.

Chipper shredders are a great way to accomplish this. They're available as electric chipper shredders or gas chipper shredders, though the electric shredder type is all you need unless you're looking to chip branches and limbs as well.

If you're mostly interested in using shredded leaves to fertilize your lawn, you can use mulching kits for lawn tractors, and serve multiple purposes at once. A mulching kit will allow you to mow your lawn while mulching any leaves and evenly spreading them into the grass. 

As the shredded leaves break down, they add nutrients to the soil, acting as an organic fertilizer for anything from grass to flowers or vegetable gardens. No need to spend money on inorganic fertilizers at the store when you can recycle what you're already getting for free year-after-year.

Thursday, June 26, 2014

Curing Firewood the German Way

Many of us in the U.S. know how to stack firewood in the classic row-style on a rack.

However, if you have a lot of wood to stack, perhaps more than you can fit on your rack, and it needs to be cured, a Holz Hausen is an attractive and very functional way to stack and season firewood without a rack.

1. Drive the Stake
Drive a stake about 7-8 feet tall into the ground where you want to build your Holz Hausen. Mark the stake 5 1/2 feet above the ground.  The stake marks the center of the ring, and as your pile gets larger, the pieces of wood will somewhat fall inward and rest against the stake.

2. Ring Around the Rosie
Lay your logs around the stake in a circular fashion, smaller ends pointing toward the stake. Stack a couple of rows high to create a solid base. Once you've got a nice, even two-layer ring, stack a perpendicular layer (lengthwise) continuing to the outer edge of the ring.

3. Throw the Scraps in the Bin
There will be an empty area in the middle of your ring. That area is for throwing uneven or oddly shaped scrap wood that won't stack neatly.  Stack the inner and outer lengthwise rings evenly to improve stability and prevent it from collapsing. Throw scrap pieces in the middle as you go to provide some inner support.

4. Top it Off
Once you've reached the 5 1/2 foot marker on your stake, allow pieces to begin slope outward toward the outside. Then you can cover the top of the Holz Hausen with wood laid with the bark facing up in order to shield the wood underneath it from getting wet when it rains or snows.

Now you've got yourself a beautifully functional Holz Hausen, and plenty of room left on your firewood holder for the wood that's finished curing. Keep the cured wood on your firewood holder by your house for easier access.

How to Maintain an Electric Chainsaw

Electric chainsaws are quieter, lighter-weight than gas models, and easy to start. All they need to run is an extension cord and an outlet.

But what about maintenance? After all, one of the advantages of an electric chain saw is not having to do oil changes and refill the gas, right?

Electric chainsaws are definitely cleaner and easier to maintain than gas models, but they do still require some maintenance. To keep your chainsaw running smoothly for years to come, here are few tips to consider following.

Chain Oil
While you don't have to change out motor oil, your chain isn't very fond of dry friction against the bar. It's very important to stay on top of keeping your chain lubricated with oil to prevent it from wearing out. Oiling the chain will also aid in providing a smoother cut. Any clean motor oil should do, but if you're using your saw in cold winter weather, be sure to use an oil with a lower viscosity.

Chainsaw Bar
Wear and tear can present issues with a bar. Be sure to clean out any dust or debris in the bar's groove. You can use a wire, pipe cleaner, etc. to do this. Inspect the bar for any burred edges, and file any down outside the groove. If your bar is cracked, bent, or excessively worn, change it out with a new bar.

Extension Cord
If you're operating an electric chainsaw, you will inevitably have to maintain a safe and functional extension cord. Make sure you use an extension cord that's approved for outdoor use. They're usually marked with a W or W-A suffix.  Using an indoor, improperly sized extension cord can cause your saw's motor to overheat and suffer damage. If your cord ever becomes frayed or worn to the point where it's exposing any wiring, dispose of it and get a new one.

Long-Term Storage
Before putting away your chain saw for the winter, it's a good idea to winterize it for storage. Drain chain oil and remove the chain and bar. Soak and clean the bar and chain, dry them, then apply a thin layer of oil to help preserve them and prevent rusting. If your chain is too worn down to be sharpened, dispose of it and replace it for the next season. If the chain is damaged or broken, don't attempt to repair it - buy a new one.

Tuesday, June 24, 2014

Creating Better Compost With Your Chipper/Shredder

Although we all know chipper shredders are great for reducing logs and branches into mulch, what many don't realize is that chipper shredders are also very useful in creating high quality compost for enriching your top soil or adding into garden beds for more successful yields.

In many cases, gardeners will just toss piles of leaves, grass clippings, mulch, and old organic food waste into a pile and let time work its magic in breaking down and decomposing the matter. However, to speed up the process, you can utilize chipper shredders to break down and blend up the compost, effectively giving Mother Nature a little bit more down-time.

Just make sure to only use the chipper shredder for outdoor waste such as leaves, twigs, branches, logs, and dry grass clippings. Don't run kitchen scraps through your chipper shredder, as they're typically moist/sticky and contain bacteria.

When breaking down and mixing compost, it's best to use a 50-50 or 70-30 blend. That's 50% live matter (i.e. green vegetation, old bell peppers, lettuce, and anything else that's not dead and dried out) and 50% dry leaves, twigs, and mulch. Or for a "hotter" compost pile, use 70% live and 30% dried matter.

Using kitchen scraps is a great way to add to the variety of your compost heap, but make sure you don't use meats, cheeses, or old chicken bones. Those kinds of materials will rot and ruin your compost pile while adding unsafe and unwanted toxins to the mix.

Once you've got all of your organic compost broken down into smaller pieces and blended with your kitchen scraps, add whatever other minerals into it, stir it with a pitch fork or other similar tool, and leave it alone. Let nature run its coarse. Every now and then, stir your compost pile to release excess heat and moisture. If you leave it too long without stirring, the heat and moisture will turn your precious compost into a gooey mess instead of the nutrient-rich soil you're aiming for.

If you don't already have a chipper shredder for breaking down yard waste, there are many good models available as well as how-to guides and other helpful information that can be found at Chippers Direct online.


Monday, June 2, 2014

5 Amazing Uses for Wood Chips

A wood chipper is a great way to break down timber and branches, but what do you do with the chips when you're done?

While some people throw the chips away, there are a few good uses for them that could save you money or even make you money.

Use or Sell as Mulch
Aside from selling large bags as mulch, you could use the chips as mulch on your own property instead of buying bags at the store. Depending on which you choose, you'll either make money or save money.

Show Some Generosity
If you've just finished running limbs through your chipper shredder and you simply want to get rid of the chips, try giving them away to friends, neighbors, family, or community service groups for use in flower beds and walkways.

Fuel for Wood Burning Furnaces
Wood chips can also be used in certain types of furnaces as fuel for heating your home in the winter. If people in your area use wood burning furnaces, you can donate or sell the chips to them.

Spice Up a BBQ Party
Using them in fire pits as kindling is an option, but soaking them in water and tossing them in the BBQ grill adds a great smoky flavor to ribs, sausage, chicken, and fish.

The Smell of Cedar
If they're cedar, you have even more possibilities. Cedar chips are often used for stuffing dog beds, lining guinea pig, hamster, and rabbit cages, and seasoning fireplaces to give off a nice aroma.

So next time you're putting away your chipper, don't just throw those chips away. They have so many other uses. If you can think of any other creative uses for wood chips, share in the comments below!

Wednesday, May 14, 2014

Chipper Maintenance Made Easy


More Chipper Maintenance Tips
Spring is here, and summer is approaching. This means you likely have some cleanup to do on your property. With springtime storms, you may find a lot more debris on your lawn, and new landscaping often means "out with the old."

So what do you do with all of the debris and old shrubs and trees you're getting rid of? Perhaps you take them to the curb for pickup, or maybe burn them in a pile? A much better alternative is chipping. This will provide you with a way to recycle what you're getting rid of.

Chippers can turn old dead eyesores into a beautiful and functional mulch to use in your flower beds and other areas to beautify your property, control weeds, and save you from spending more money at the local garden shop.

Along with using chippers comes maintenance. With the right understanding of what needs to be done and when, you'll find that maintaining your chipper shredder is easier than you think.

Below is a chart from MTD that will help you keep track of what needs to be done and how frequently. You can print it off, laminate it, and nail it to the wall inside your shed. this way you can use a dry-erase marker to check off each thing you do and erase your markings at the end of each year.

mtd's WOOD CHIPPER MAINTENANCE CHART 


Chipper/Shredder Maintenance
Before each use
Every 8 hours
Every 25rs
Every 50 hours
Annually
Clear Grass & Debris Away from Muffler & Engine
X
Clean Control Linkage
X
Fill Fuel Tank
X
Fill Oil
X
Lubricate All Moving Parts
X
Lubricate Chute Release Rod
X
Lubricate Control Levers & Check for Smooth Operation
X
Lubricate Hopper Assembly & Discharge Chute at the Swivel Pivot Joints. Test Full Range of Motion.
X
Replace Air Filter
X
Change Oil
X
Replace or Sharpen Chipper/Shredder Blades
X
Replace Spark Plug
X
Wash Collection Bag
X

Tuesday, March 11, 2014

Chippin' Twigs and Shreddin' Leaves

With an electric chipper shredder, you are able to chip smaller branches and shred debris like leaves and twigs at the same time.

Any homeowner with a decent sized lot and a few trees can use a chipper shredder to keep their property clean.

Electric chipper shredders are lighter weight, gasless, economical, and offer a typical home owner the option of recycling their yard waste without dropping serious money on a large gas model.

Some people use electric chipper shredders for the garden. Shredding old garden matter like vegetables, leaves, roots, sticks, and other organic waste, you can create your own compost pile.


Monday, January 6, 2014

Bone Chilling Cold in Upper Midwest

West-coasters who are upset about temperatures in the 50s should visit the upper Midwest this week. Northern Illinois, Wisconsin, Minnesota, and parts of Michigan are experiencing temperatures below -10 degrees today with wind chills as low as -65 degrees.

All over, people are throwing hot cups of water in the air to watch in awe as it freezes into snow before hitting the ground. This is cold!

An important thing to keep in mind is what you can do if the power goes out. In this kind of cold, it's important to have a backup plan. Survival in severe subzero cold requires a lot more than just putting on a sweatshirt and mittens. How can you heat your home if you don't have electricity to run your furnace?


Electric Generators

Emergency portable generators are a very effective solution. They must be run outdoors though, at least 10-18 feet from your home because they produce carbon monoxide. Portable generators are great in these situations because they can power your furnace and lights during an outage, and then be stowed away after the power is restored.

Fireplace

You can always go the old school route and burn firewood in a fireplace or a wood burning stove. There are many ways of splitting firewood. You can use a gas log splitter outdoors, an electric log splitter indoors or outdoors, a manual log splitter from the comfort of your living room, or a hatchet on a stump should you need the exercise.

A manual log splitter is much easier than a hatchet, but may not be ideal if you're splitting lots of wood.

An electric log splitter is much easier and more powerful than a manual splitter, and it can be used safely indoors. It's quieter and doesn't give off fumes.

A gas log splitter is the most powerful, but can only be used outdoors. It's usually larger, louder, and or course requires gasoline.

Once you choose the splitter(s) that you want, you can being splitting firewood. It's best to do a large amount in the early fall and stack it up someplace dry. This gives it time to cure and dry out. That way, by the time you need it, it'll be ready to burn.

Whatever you end up choosing, make sure you stay warm enough. This weather is dangerously cold, and you want to be sure you're safe.

Friday, January 3, 2014

Electric Log Splitter Hydraulic Oil

Electric log splitters may not require gasoline, but they do require the use of hydraulic oil. For electric log splitters, it's recommended you use hydraulic oil with a 10W weight rating. This type of hydraulic oil is capable of properly lubricating the moving parts of your splitter during cold or hot weather.

In addition to lubricating your splitter's moving parts, this hydraulic oil is also used for pressurizing the hydraulic system. When you start the motor, the hydraulic system begins to build up pressure with the hydraulic oil. The splitter is then capable of applying enough pressure on the log to split it against the splitter wedge.

You need to change the hydraulic oil in your log splitter after every 150 hours of operation time. If you don't, you run the risk of damaging components within your hydraulic system when the sediment within the oil settles onto your splitter's hydraulic components.

It's also possible for the oil levels to get low if now maintained properly. If your log splitter motor is giving off a humming sound and the pusher isn't moving, you may need to add more oil. If it's been a while, you should first drain the old oil and then refill it with the proper amount of fresh oil. Use your dipstick to measure the oil level to ensure it's where it should be.

Lastly, be sure you're bleeding your hydraulic system during use. Electric log splitters have a bleed screw that allows air out of the system to prevent over-pressurizing it. The bleed screw should remain tightened shut during storage or whenever the splitter is being moved., but should be opened whenever in use to avoid damaging the internal components.

Thursday, December 12, 2013

Indoor Log Splitting - Done Safe

Nobody likes going outside to split firewood when it's cold enough to freeze your nose hairs, but how else are you going to split more firewood to keep the family warm?

Splitting wood indoors is far too dangerous with a gas-powered log splitter, in fact it's downright deadly because of the poisonous exhaust fumes. Electric log splitters are safe indoors, but they're inconvenient and take up space.

Manually-operated log splitters are by far the most sensible option. The WoodEze manual firewood splitter is incredibly convenient and safe for splitting up firewood. 

1. Find yourself a hardwood stump and drill a 12 cm hole in the top. 
2. Insert the splitter into the hole.
3. Tighten bolt with a wrench to secure the splitting wedge.
4. Lift the handle and place the log to be split under the wedge.
5. Lift the striking weight with both hands and then drop it onto the wedge.

It's safer and easier than an axe, and the guide bar keeps it on target every time. It strikes with up to 14 tons of pressure at the edge of the blade. The size makes it easy to stow away, and the simplicity and sturdiness of the construction means there's no maintenance required.

So as long as you have relatively small logs that are able to be split, you can split firewood into smaller pieces from the warmth and comfort of your living room. And you don't have to be concerned with the dangerous fumes of gas splitters.

Thursday, November 14, 2013

How to Winterize a Wood Chipper

We all know the frustration of pulling out power equipment in the spring or summer to find that it won't start like it should. 

It's so easy to push your wood chipper to the back of the garage when winter gets here and forget about it for a few months, but without properly winterizing it, you may have a bad time in the spring.

If you want to have an easy time starting and operating your chipper next season, here are a few tips on proper winter storage and maintenance that we recommend.


Electric Chippers 

Electric chippers are a lot easier to take care of than gas chippers, because there is no fuel or fluids involved; however, when it comes to winterizing an electric chipper, there are a few simple things you should do.

  • Clean out the unit as well as you can, all the way down to the chipper blades if you are capable, to insure that no leaves, dirt, or sap will sit in your chipper for months without movement. An air compressor can help accomplish this.
  • Once you've finished cleaning it and putting it back together, it's a good idea to apply a small amount of grease or lube to all of the moving parts. 
  • Last, but not least, go and buy yourself an inexpensive universal cover to keep dust and rodents from making your machine their winter home.


Gas Chippers

Gas chippers require a couple of extra steps. The tips for electric chippers still apply, but the gas engine requires a few extra tips that should not be forgotten. The engine is the heart of your gas chipper, and just like you have to care for your own heart, it's important to care for your chipper's as well.

  • Follow the same tips noted above for electric chippers. Then continue to follow the tips below.
  • Drain all gasoline from your chipper and run the engine dry. If you don't want to waste the fuel or go through the trouble of draining it, you should at least add fuel stabilizer to prevent the fuel from spoiling.
  • Change the oil and replace the spark plug. You can do this prior to storage, but I recommend doing it at the start of the next season. Changing your oil and replacing your spark plug at the start of the next season ensures that everything's fresh, and will assist an a much easier start-up.


Well I hope these tips helped, and stay warm this winter my friends!


Friday, October 25, 2013

Keeping Engines Clean With Detergents!


Gasoline is something you may not give a lot of thought to, but the type of fuel you use in your chainsaw makes a difference in the lifespan and in how well your saw runs.

I strongly advise using fresh gasoline with an octane rating of 89 or higher (mid grade or premium).

Most of the regular unleaded 87 octane gasoline that is available on the market today contains minimal amounts of detergent additives, which in four stroke applications keep pistons, valve stems, and fuel injectors clean. These same additives are needed in a two stroke engine to keep varnish, gum, and lacquer deposits from forming inside the engine. 

Pressure from the automotive industry has caused the gasoline suppliers to blend the 89 to 91 octane gasoline range with greater amounts of detergents and anti-oxidizing additives to prevent formation of deposits and keep engines clean.


Lack of detergent additives in two stroke fuel will cause heavy buildup of varnish, gum and lacquer deposits on the piston surface and inside of the ring grooves. Heat transfer from the piston to cylinder will suffer. Once the ring starts sticking in the ring grooves, combustion flame and exhaust gases will leak past them, further overheating pistons causing galling or seizures.

Since alcohol has been added to gasoline, power equipment manufacturers do not recommend storing fuel for more than 30 days. This period can be even shorter in hot and humid climates. Today, gasoline is considered too old for use in the two stroke engines if it’s older than 30-45 days. 

Fuel older than 30 days will begin to form varnish and gum. When the varnish and gum are heated by the combustion, they combine and form the byproduct tar. The tar byproduct is the number one cause of blocked spark arrestor screens and stuck piston rings. 

Since old gasoline won't vaporize well in the crankcase, the fuel will puddle in the crankcase, causing spark plug fouling, engine flooding and hard starting. Old, stale, oxidized fuel will also quickly form gum, varnish and deposits inside the carburetor and fuel system components. This is the most commonly found issue at many dealerships at the beginning of the season, primarily with products that are used seasonally.

"Moral of the Story"
Use only fresh mid-grade or premium gasoline in your chainsaw engines and other 2 cycle engines. It'll make your chainsaw last longer and run better with less maintenance and repair hassle.

Thursday, October 24, 2013

Ready or Not, Here Comes Cyber Weekend!


By now, you know what Black Friday is. It's notorious for being a violently aggressive rush for deals. However, that isn't necessarily the case for online shoppers.

If you're not familiar with it, Cyber Monday is the Monday after Thanksgiving when online retailers drop their prices and list significant sales on their products. It's a day when millions of internet shoppers can get Black Friday prices without the hassle of fighting angry soccer moms over the last "Tickle-Me Elmo."

We will be celebrating Black Friday and Cyber Monday with deals on all of our power equipment sites. You'll be able to find some quality brand-name tools and equipment for unbelievable prices all through Cyber Weekend (Friday-Monday).

However, we will not be here Friday-Sunday! While other retailers make their employees work overtime and weekends, we choose to send our employees home for the weekend to be with their family.

Every site we have has Buyer's Guides to help you in the decision making process, so even though you can't reach customer service or our experts, we've done our best to provide you with answers to as many questions as possible. If you want more information, you can scroll to the bottom of the site and click on our "How-to Library," where you can find many articles about our power equipment.

Plus, most of the items on our site have customer reviews and accurate up-to-date ratings generated by our cutting-edge algorithm so you can feel confident in your selection.

If you have questions or concerns about your order, feel free to contact us on Cyber Monday, December 2nd, 2013.


Find Cyber Monday Deals at the Following Stores: