Showing posts with label log splitters. Show all posts

Friday, October 10, 2014

Seasoning Your Firewood!


If you have a fire place or a wood burning stove and use it regularly, properly seasoning or drying your firewood is a must. Burning unseasoned firewood can be a hassle in the short term and dangerous in the long term. Freshly cut wood can contain up to 50% moisture and when burned can create a lot of smoke, low fire and heat output, and short burn times. Over a long period a substance called creosote can build up in your chimney and can be potentially dangerous.

Creosote is a black oily substance that builds up around the inside of a chimney or flue that is caused by burning wet wood at low temperatures. The low heat causes incomplete combustion of the oils in the wood, which are then carried up the chimney as a gas by the smoke. As the gas cools it condenses around the sides of the chimney causing the build up over time. If enough creosote accumulates it can cause smoke to back up into the house and even ignite, potentially causing a house fire.

 Creosote Build Up

To prevent this you must reduce the moisture content in the wood to around 20%. This ensures that the oils have not fully evaporated, which help the wood burn at a higher temperature. This will allow the wood to burn hot enough to completely ignite the oils reducing the creosote build up.

Here are the steps involved in properly seasoning your firewood:

1. Selecting the right wood

Not all wood is the same. Some are harder with more knots, some burn hotter, and some smell different while burning. Knowing what kind of wood you are using is important in knowing how long you need to season it. For example, oak is a very good type of wood for burning. It is dense, burns hot, and you should season it at least a year before burning. Check out this quick guide on Best Wood for Fires.

You will first need to select the tree you are going to fell. You want to make sure it is not dead and rotting as it will not burn well, and there will be a lot of mold and bugs living in there. It is a good idea however, to remove it to allow for healthy competing trees to grow. You will want to select trees that are crowded or inferior that are competing for sunlight and soil nutrients. This will allow the healthiest and most productive trees to thrive.


2. Cutting and Splitting


After your tree comes down you're going to want to remove the limbs and cut it into chunks, also known as limbing and bucking. The most important thing here is to make sure you get the right length and are consistent. Uneven lengths will make your cords unbalanced. Sixteen inches is pretty standard, if you have a 16" bar you can use that to measure, otherwise you can use a tool like the Mingo Log Marker.  

Once you're done bucking the tree, you're going to want to split the chunks into manageable pieces. There are a few different ways you can go about this depending on the amount of wood that needs to be split. You can use a traditional splitting maul, which is good if you have minimal work as it requires a lot of energy. There are manual log splitters that require less energy but are more time consuming. And then there are gas or electric powered hydraulic log splitters which will be your best bet if you have a lot of wood to split.

http://www.logsplittersdirect.com/Ariens-917011-Log-Splitter/p10483.html
  22-Ton Gas Powered Hydraulic Splitter

3. Stacking and Storing

Now that you have enough pieces of the right size and type of wood, it is time to stack them up. This part is where you are not going to want to get lazy and pile your wood up like this:


The wood in the middle of pile will mold and rot before it has time to dry. You also want to keep the wood off the ground so it doesn't absorb moisture. Stacking in rows with a couple of feet between them to allow wind and sun light to dry them out is ideal. Getting a log rack is great for keeping the rows nice and neat.

The size of your stack is dependent on how much space you make available but wood is measured in cords. A cord of wood is 4' x 8' x 4' and is 128 cubic feet. You can even get artistic with it if you want!


After you have it all stacked up, you're going to want to cover it. Using a tarp secured to the top works perfectly. Make sure you don't cover everything, you want the ends of the wood exposed to help dry it out.

4. Wait

Most wood takes 6 months to a year to completely season depending on what type of wood you're burning, so you're going to want to plan ahead for that. You will know your wood is seasoned when it looks like this:


Once it is a darker color with cracks on the ends it is probably good to go. Another way to check is by burning a piece. If it doesn't ignite well and hisses then it is too wet to burn.

So there you have it! Seasoning your firewood will make your life easier if you are the kind of person who burns it on a regular basis. Take these steps and apply them properly and you will have plenty of great burning firewood to last you for many winters!


Thursday, June 26, 2014

Curing Firewood the German Way

Many of us in the U.S. know how to stack firewood in the classic row-style on a rack.

However, if you have a lot of wood to stack, perhaps more than you can fit on your rack, and it needs to be cured, a Holz Hausen is an attractive and very functional way to stack and season firewood without a rack.

1. Drive the Stake
Drive a stake about 7-8 feet tall into the ground where you want to build your Holz Hausen. Mark the stake 5 1/2 feet above the ground.  The stake marks the center of the ring, and as your pile gets larger, the pieces of wood will somewhat fall inward and rest against the stake.

2. Ring Around the Rosie
Lay your logs around the stake in a circular fashion, smaller ends pointing toward the stake. Stack a couple of rows high to create a solid base. Once you've got a nice, even two-layer ring, stack a perpendicular layer (lengthwise) continuing to the outer edge of the ring.

3. Throw the Scraps in the Bin
There will be an empty area in the middle of your ring. That area is for throwing uneven or oddly shaped scrap wood that won't stack neatly.  Stack the inner and outer lengthwise rings evenly to improve stability and prevent it from collapsing. Throw scrap pieces in the middle as you go to provide some inner support.

4. Top it Off
Once you've reached the 5 1/2 foot marker on your stake, allow pieces to begin slope outward toward the outside. Then you can cover the top of the Holz Hausen with wood laid with the bark facing up in order to shield the wood underneath it from getting wet when it rains or snows.

Now you've got yourself a beautifully functional Holz Hausen, and plenty of room left on your firewood holder for the wood that's finished curing. Keep the cured wood on your firewood holder by your house for easier access.

Monday, January 6, 2014

Bone Chilling Cold in Upper Midwest

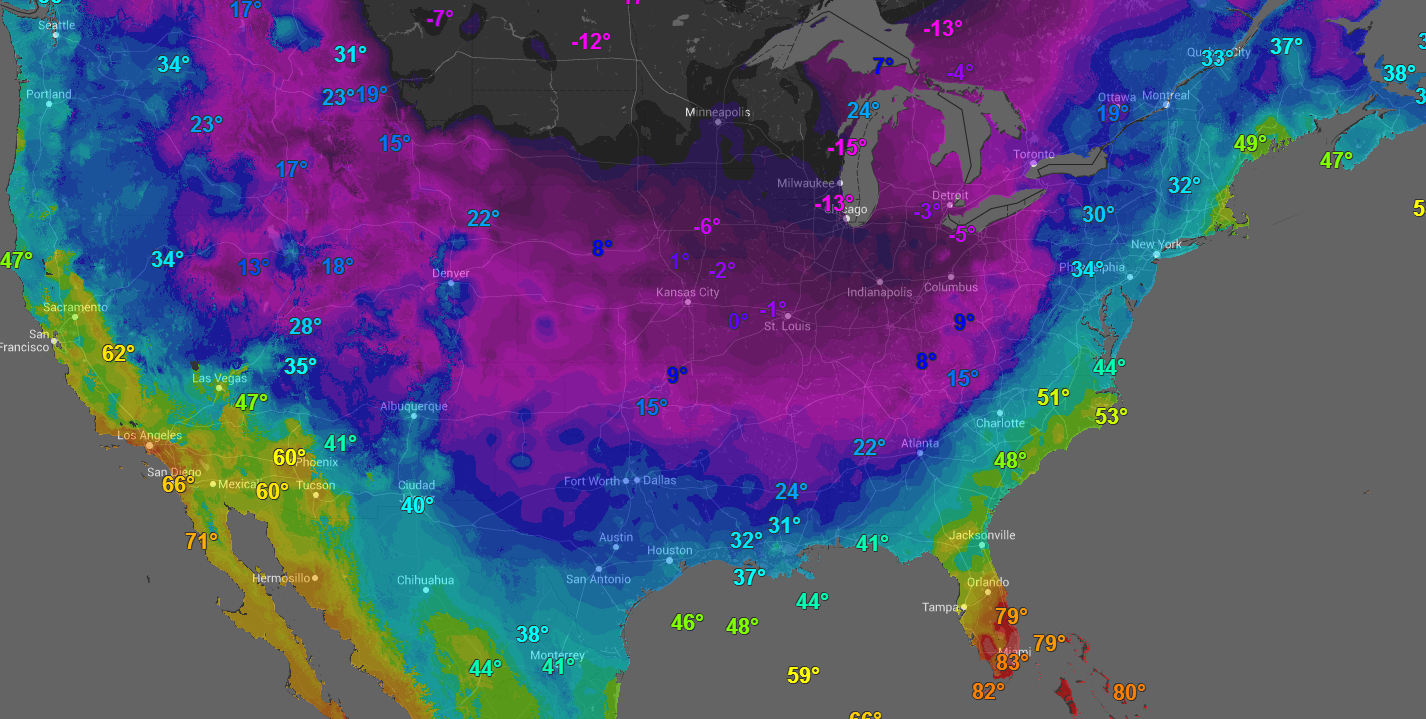
West-coasters who are upset about temperatures in the 50s should visit the upper Midwest this week. Northern Illinois, Wisconsin, Minnesota, and parts of Michigan are experiencing temperatures below -10 degrees today with wind chills as low as -65 degrees.

All over, people are throwing hot cups of water in the air to watch in awe as it freezes into snow before hitting the ground. This is cold!

An important thing to keep in mind is what you can do if the power goes out. In this kind of cold, it's important to have a backup plan. Survival in severe subzero cold requires a lot more than just putting on a sweatshirt and mittens. How can you heat your home if you don't have electricity to run your furnace?


Electric Generators

Emergency portable generators are a very effective solution. They must be run outdoors though, at least 10-18 feet from your home because they produce carbon monoxide. Portable generators are great in these situations because they can power your furnace and lights during an outage, and then be stowed away after the power is restored.

Fireplace

You can always go the old school route and burn firewood in a fireplace or a wood burning stove. There are many ways of splitting firewood. You can use a gas log splitter outdoors, an electric log splitter indoors or outdoors, a manual log splitter from the comfort of your living room, or a hatchet on a stump should you need the exercise.

A manual log splitter is much easier than a hatchet, but may not be ideal if you're splitting lots of wood.

An electric log splitter is much easier and more powerful than a manual splitter, and it can be used safely indoors. It's quieter and doesn't give off fumes.

A gas log splitter is the most powerful, but can only be used outdoors. It's usually larger, louder, and or course requires gasoline.

Once you choose the splitter(s) that you want, you can being splitting firewood. It's best to do a large amount in the early fall and stack it up someplace dry. This gives it time to cure and dry out. That way, by the time you need it, it'll be ready to burn.

Whatever you end up choosing, make sure you stay warm enough. This weather is dangerously cold, and you want to be sure you're safe.

Friday, January 3, 2014

Electric Log Splitter Hydraulic Oil

Electric log splitters may not require gasoline, but they do require the use of hydraulic oil. For electric log splitters, it's recommended you use hydraulic oil with a 10W weight rating. This type of hydraulic oil is capable of properly lubricating the moving parts of your splitter during cold or hot weather.

In addition to lubricating your splitter's moving parts, this hydraulic oil is also used for pressurizing the hydraulic system. When you start the motor, the hydraulic system begins to build up pressure with the hydraulic oil. The splitter is then capable of applying enough pressure on the log to split it against the splitter wedge.

You need to change the hydraulic oil in your log splitter after every 150 hours of operation time. If you don't, you run the risk of damaging components within your hydraulic system when the sediment within the oil settles onto your splitter's hydraulic components.

It's also possible for the oil levels to get low if now maintained properly. If your log splitter motor is giving off a humming sound and the pusher isn't moving, you may need to add more oil. If it's been a while, you should first drain the old oil and then refill it with the proper amount of fresh oil. Use your dipstick to measure the oil level to ensure it's where it should be.

Lastly, be sure you're bleeding your hydraulic system during use. Electric log splitters have a bleed screw that allows air out of the system to prevent over-pressurizing it. The bleed screw should remain tightened shut during storage or whenever the splitter is being moved., but should be opened whenever in use to avoid damaging the internal components.

Thursday, October 24, 2013

Ready or Not, Here Comes Cyber Weekend!


By now, you know what Black Friday is. It's notorious for being a violently aggressive rush for deals. However, that isn't necessarily the case for online shoppers.

If you're not familiar with it, Cyber Monday is the Monday after Thanksgiving when online retailers drop their prices and list significant sales on their products. It's a day when millions of internet shoppers can get Black Friday prices without the hassle of fighting angry soccer moms over the last "Tickle-Me Elmo."

We will be celebrating Black Friday and Cyber Monday with deals on all of our power equipment sites. You'll be able to find some quality brand-name tools and equipment for unbelievable prices all through Cyber Weekend (Friday-Monday).

However, we will not be here Friday-Sunday! While other retailers make their employees work overtime and weekends, we choose to send our employees home for the weekend to be with their family.

Every site we have has Buyer's Guides to help you in the decision making process, so even though you can't reach customer service or our experts, we've done our best to provide you with answers to as many questions as possible. If you want more information, you can scroll to the bottom of the site and click on our "How-to Library," where you can find many articles about our power equipment.

Plus, most of the items on our site have customer reviews and accurate up-to-date ratings generated by our cutting-edge algorithm so you can feel confident in your selection.

If you have questions or concerns about your order, feel free to contact us on Cyber Monday, December 2nd, 2013.


Find Cyber Monday Deals at the Following Stores:


Monday, October 7, 2013

Using Log Splitters in the Winter

We all know that we would love to split our wood on a nice, clear day with a cool breeze. We all know that this will most likely never be the case. If you need to use your log splitter in the middle of the winter or in temperatures below proper operating temperature, here is what I recommend.

The log splitters will function below 41 degrees; however the functionality is decreased when operated in temperatures below 41 degrees.

It is recommended that in temperatures below 41 degrees that the splitter is allowed to warm before operation.

In temperature conditions below 10 degrees I recommend using electric log splitters inside. If you have a gas-operated splitter, you must use it outside. For these, you'll want to warm your gas splitter overnight by storing it inside. Otherwise, you could use an engine block heater to warm the oil chamber prior to use.

I do not recommended you use a different oil than what is recommended by the manufacturer. The best option is to put a magnetic block heater on the wood splitter when it is in storage so that the oil stays heated and will thin when you start it.

If it is really cold where you are using the splitter, just leave the magnetic heater on the splitter while using it. The reason you have to take these precautions to keep the log splitter warm is that when the temperature drops below 41 degrees, the hydraulic oil gets too thick. You may be tempted to change to a thinner oil, but doing so may put your log splitter at risk of overheating in summer months.

For more information, the most up-to-date log splitter ratings and reviews, or to stock up on accessories, visit www.logsplittersdirect.com